Creating an Asset Type in Enterprise Store
Applies to WSO2 Enterprise Store, Version 1.2.0 and above
The Enterprise Store provided by WSO2 brings a “user-friendly experience to the enterprise for accessing and managing digital assets. Development teams and business users alike can easily and rapidly discover, subscribe, and make use of various enterprise assets such as APIs, mobile apps, web apps, and services to increase productivity and better utilize available assets”, which mean you can have your own store of digital assets. the store comprises of initially 3 types of assets, which are, E-Books, Sites and Gadgets. The store can be extended to hold our own Asset Type similar to E-Books, Sites and Gadgets.
Initially, all the asset types are configured through Registry Extension Files and their Lifecycle files. In this tutorial we will focus on creating our own rxt file to support our asset type. The Asset Type to be created will use the OOB Life Cycle. In order to create your own life cycle follow this guide.
As you skim through the content below please note YOUR_ASSET_TYPE should be replaced with your asset type name.
Creating the Your_ASSET_TYPE.rxt file.
The template given below is the template of the rxt file provided in the Enterprise Documentation, rename all the locations showing YOUR_ASSET_TYPE with your asset name, some require singular names and some require plural so spend some energy and replace the tags with some meaningful type names.
</pre>
<?xml version="1.0"?>

<artifactType type="application/vnd.wso2-YOUR_ASSET_TYPE+xml"shortName="YOUR_ASSET_TYPE" singularLabel="YOUR_ASSET_TYPE"

pluralLabel="YOUR_ASSET_TYPE"

hasNamespace="false" iconSet="10">

<storagePath>/YOUR_ASSET_TYPE/@{overview_provider}/@{overview_name}/@{overview_version}</storagePath>

<nameAttribute>overview_name</nameAttribute>

<ui>.....</ui>

<content>

<table name="Overview">

<field type="text" required="true">

<name>Provider</name>

</field>

<field type="text" required="true">

<name>Name</name>

</field>

<field type="text" required="true">

<name>Version</name>

</field>

</table>

<table name="Images">

<field type="text" required="true">

<name>Thumbnail</name>

</field>

<field type="text" required="true">

<name>Banner</name>

</field>

.....

</table>

</content>

</artifactType>
<pre>
So once you edit the rxt to hold your asset type name as mentioned previously and the changes to the fields have been made save the file as YOUR_ASSET_TYPE.rxt. (e.g – if your asset type name is process, create a folder called process in your desktop and save this file as process.rxt).So now you should have your own rxt file.
There are two methods to add this rxt file to the server.
Method 1 – Copy your YOUR_ASSET_TYPE.rxt file and place it into the <ES_HOME>/repository/resources/rxts/ directory. We place the file here with all the other rxts in the enterprise server. If the server is already started, please restart the enterprise server in order to copy the rxt to the server and to be able to use it. The directory structure below depicts the location where the rxt has to be placed in order for the server to pick the file up.

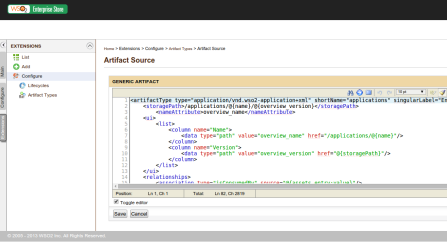
Method 2 – The new asset type also can be directly created on the server. In order to do this navigate to the Carbon management console, on the left hand side of the screen you will find several vertical tabs, click on extension (see image below location of the tab is marked with “1”). In Extensions, look for artifacts (see image below location of the tab is marked with “2”) and then click on add new artifact (see image below location of the tab is marked with “3”).

Once you click on the Add new artifact, a editor will be shown (as shown below), copy your rxt file content and paste it in the editor and save the artifact under the name of the artifact and reload the server.
Since the rxt file has been created, now we need to do some simple tweaking to the files in enterprise store to generate the UI.
Firstly, Navigate to the store-tenant.json file in the
<ES_HOME>/repository/deployment/server/jaggeryapps/store/config/ folder, and update the value by adding the new asset type.
For example: [“gadget”, “site”, “ebook”, “YOUR_ASSET_TYPE”]
Also note if you have already started the server and if this is not the first start or a fresh pack, you will have to also update the store.json file via the Carbon Management Console, which is in the /_system/store/configs/directory. cause when you start the server for the first time the store-tenant.json file is copied to the Registry; therefore, if you have started the server previously it will not have the files.

This step is optional but will come in handy when the UI of the Store for the new asset needs to be modified. Navigate to the <ES_HOME>/repository/deployment/server/jaggeryapps/store/extensions/assets/ directory, in the assets folder/directory create a folder/directory with your asset type name.(e.g – if your asset type name is process, then create a folder in the assets folder called process) Create a file named asset.js, in the<ES_HOME>/repository/deployment/server/jaggeryapps/store/extensions/assets/YOUR_ASSET_NAME/ directory with the following content.
var assetLinks = function (user) {
return {
title: ‘YOUR_ASSET_TYPE’
};
};
As the value of the title variable will appear in the UIs, you need to ensure to add an appropriate name for the title. This title will be carried to all views belonging to your asset type. This file will be of value when making changes or overriding how the data is manipulated server side.
Now that the front-store configuration is done, lets look at the the Back-office which is also known as the publisher as follows:
Navigate to the publisher-tenant.json file in the <ES_HOME>/repository/deployment/server/jaggeryapps/publisher/config/ directory, and update the value by adding the new asset type.
It is recommended to use plurals for your asset types. The latter mentioned collection is used to give a user, access rights to a unique collection created under his or her name. This step enables the publisher to create a collection of the given asset type on behalf of the user.
For example: [“gadgets”, “sites”, “ebooks”, “YOUR_ASSET_TYPE”]
PS – When you start the server for the first time the publisher-tenant.json file is copied to the Registry; therefore, if you have started the server previously, you will have to also update the publisher.json file via the Carbon Management Console, which is in the /_system/config/publisher/configs/ directory.
These are the minimum steps to create an Asset Type in Enterprise Store. There a couple of things to be kept in mind when creating an asset type. The Asset Type you create as well as present in the store are an extension. The assets created are stored in the registry and the store api exposes the necessary methods. Other registry methods can be also accessed directly. When adding your own asset type and editing the UI, make sure you understand the directory flow and recreate the structure in the extensions/assets/ YOUR_ASSET_TYPE folder and recreate the file there with the same name and override the original file. More information on editing the UI of the store-front and the back-office can be found in the library.
